Zen Internet, IPv6 and PfSense
Zen give out documentation for how to setup IPv6 on their own devices but i didnt find any info on setting it up on pfSense. This question also appears on /r/pfsense and /r/homelab/ occasioanlly so i figured write down how i managed to get it all working.
While im not massively familiar with IPv6, i mananged to work it out enough to get this working on my home networks. For this guide, im using my “Guest” wireless network which operates on a seperate VLAN to my “Trusted” wireless devices and also LAN devices.
What you will need
When i signed up with Zen a year or so ago, you had explicitly ask to have IPv6 enabled on your service. Im not sure if this is still the case. So if you arent sure id suggest reaching out to their support people.
Once its enabled, you will recieve 2 prefixes. One is for your WAN interface, the other is for your network(s). The WAN interface prefix will be labeled “ND Prefix” and will be a /64. The LAN Side prefix will be labeled “PD Prefix” and will be a /48. As with IPv4, the smaller the subnet mask, the larger the range.
The WAN Interface
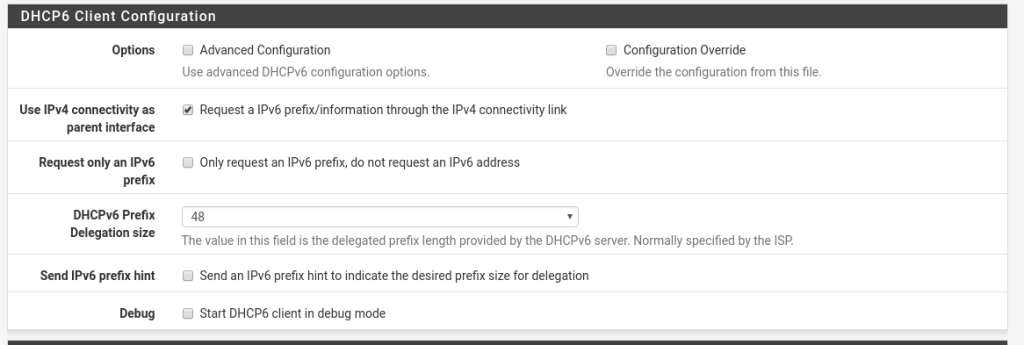
Lets start with configuring the WAN interface. There are 3 things that need to be set on the WAN interface for to work with IPv6. These are:
- IPv6 Configuration Type set to DHCP6
- “Request a IPv6 prefix/information through the IPv4 connectivity link” box ticked
- DHCPv6 Prefix Delegation size Set to 48
Here are some screenshots showing the setup.
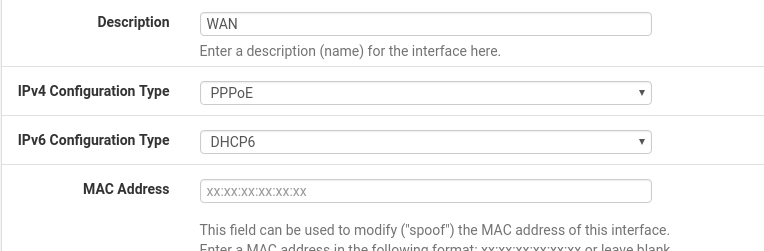
That should be all you need to configure the WAN interface. Once you have applied that, you should be able to see in the interface status, that you now have an IPv6 address as well. You can now test it is working by using the “ping” page under “Diagnostics” in pfSense. Just ensure you set the Protocol to IPv6 and set the Source address as “WAN”. I tend to just ping google, you can use the following address to test against: 2a00:1450:4007:80f::2003.

Setting up an internal network
Next we need to configure one of our internal networks. As i mentioned previously, im doing this on my guest network so that i dont break anything i may be using (though, using this guide will mean you wont break anything ? ).
I also decided to split up my /48 into /64’s so i could have different ranges on different network segments. This is pretty easy to work out, for example, if Zen gave you the PD Prefix of 1234:1234:1234::/48 and you wanted to make some /64’s, just add a number after the third 1234 so for me, as im adding 3 networks (LAN, Trusted wireless, Guest wireless) i have the following /64’s
- 1234:1234:1234:1::/64
- 1234:1234:1234:2::/64
- 1234:1234:1234:3::/64
Now we need to setup the ranges on our networks. Ill only show the guest network here as its the same for all other networks apart from changing the IP Range.
There are 2 things that you need to set on the interface.
- IPv6 Configuration Type – Set to Static IPv6
- IPv6 Address / subnet
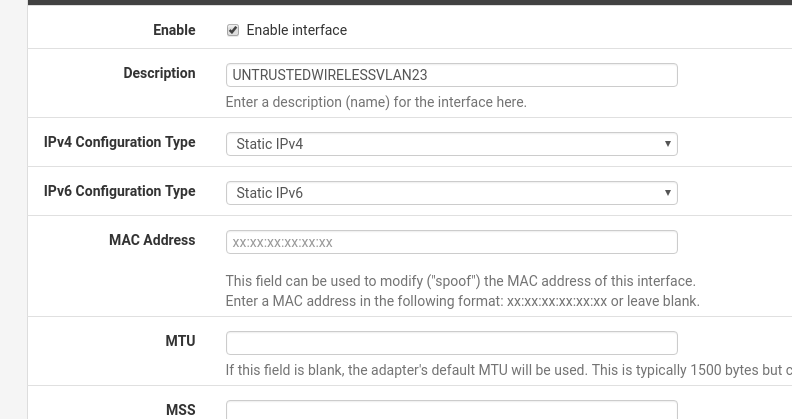
Then save the config.
Thats all that needs to be done on the interface. Now all that is left is to enable IPv6 DHCP.
Enabling IPv6 DHCP Server
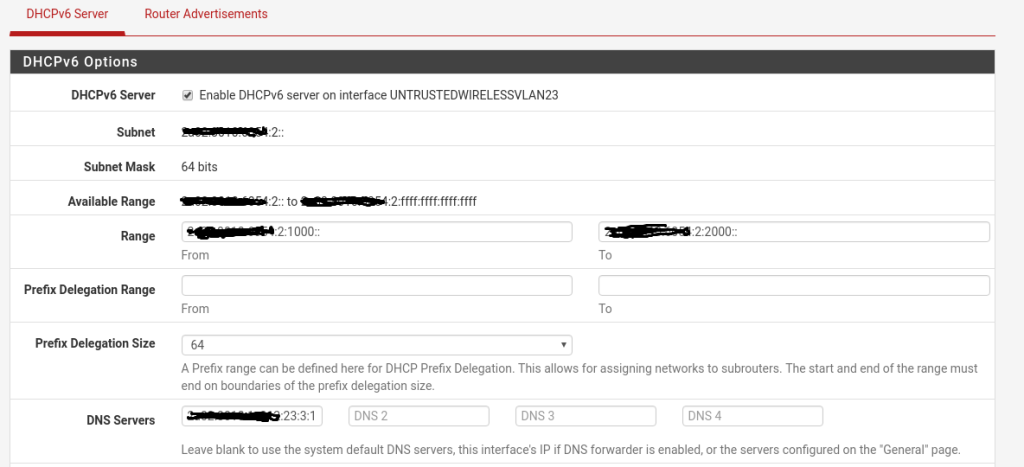
The final part of the setup is to configure the DHCP6 server. As with the previous sections, there are a couple of different things you need to configure or enable. Within pfSense, go to the DHCPv6 Server & RA section under Services. Here is what we need to either enable or configure:
- Tick the
Enable DHCPv6 server on interface…. box - Set the From and To range (i used from 1000 to 2000)
- Set the Prefix Delegation size to /64
- Set the IPv6 DNS Server.
Here is my setup.
That should be all you need. You can now test it using a site like: TestIPv6